- Published on
Creating an 'elite' highly anonymous proxy with Squid on Debian
- Authors

- Name
- Jac Timms
This is a simple guide on how to setup a Debian VM for use as an 'elite' web proxy. There are 3 types of web proxy server and what type they are basically just comes down to which HTTP Headers they include about who you are.
Transparent Proxy
REMOTE_ADDR: Proxy IP address
HTTP_VIA: Proxy IP address/hostname and details – e.g. 1.1 proxy1.mydomain.net:3128 (squid/2.7.STABLE9)
 HTTP_X_FORWARDED_FOR: Your real IP address
Anonymous Proxy**
REMOTE_ADDR: Proxy IP address
HTTP_VIA:   Proxy IP address/hostname and details – e.g. 1.1 proxy1.mydomain.net:3128 (squid/2.7.STABLE9)
HTTP_X_FORWARDED_FOR: blank
Elite Proxy
REMOTE_ADDR: Proxy IP address
HTTP_VIA: blank
HTTP_X_FORWARDED_FOR: blank
Below I'll detail the extra configuration params you need to get squid into 'elite' mode.
I like Debian mainly because it's what I know best and has a very good reputation. Ubuntu is updated every 6 months and Debian is updated when it's ready, which makes me trust it more. Also Ubuntu requires 128MB of RAM and Debian only 64MB.
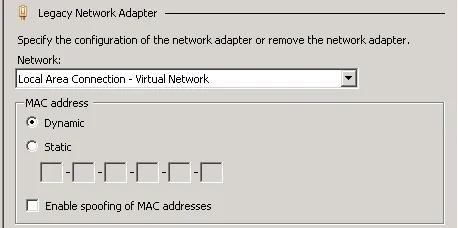
I needed to do few of these quickly, so I just did it on a Windows Server with Hyper-V as it was convenient. First I created a new VM in Hyper-V with 96MB Memory, mounted debian-6.0.2.1-amd64-netinst.iso, but if you are using Hyper-V like me, before starting the VM, you need to go to the VM Settings, remove the Network Adapter and add a Legacy Network Adapter, which should be connected to the Virtual Network as Debian has a driver for this interface already.
I am not going to walk you through all the steps of installing Debian, as it's straightforward enough and guides already exist. You'll probably want to select the option to install a SSH server during setup and once it's complete, SSH or console in and enter:
aptitude update aptitude upgrade apt-get update apt-get install squid
That will update and install Squid (it installed 2.7.STABLE9-2.1 for me), so now we need to configure it. You might also want to secure your install a bit more than it is at this point as well, such as setup iptables, Fail2ban, disable root logins, etc. but I won't go into that here. Squid should work as a proxy out of the box on port 3128 but it will identify itself as a proxy, so let's change that. The Squid config file that comes with it is almost 5000 lines and well documented so I suggest you backup the original and create a new one with just the settings we need, so that we keep it simple.
cd /etc/squid sudo mv squid.conf squid.conf.orig nano squid.conf
That will open the nano text editor, creating a new config file. Squid has some options for access control, that is, what IP addresses are allowed to use it. For more info on this, check here. For me, I wanted my LAN to have access and also my VPN clients, but you might want LAN IP addresses or to allow anyone to connect. Enter this into nano…
acl all src all cache deny all http_port 3128 transparent acl privatenet src 172.16.0.0/255.255.254.0 acl vpnnet src 10.101.10.0/255.255.255.0 http_access allow privatenet http_access allow vpnnet forwarded_for off visible_hostname proxy1.mydomain.net
That allows all IP address 172.16.0.0/23 and 10.101.10.0/24 to connect to the proxy. This setup gives us an anonymous proxy which will show as what you set in visible_hostname, however we want an 'elite' proxy, so also add…
header_access Via deny all header_access Forwarded-For deny all header_access X-Forwarded-For deny all
Exit nano with ctrl-x and save the config file when prompted, now restart Squid with…
/etc/init.d/squid restart
Once you're done, to test it add your proxy server to Firefox…

and you can check your proxy here or here.
I hope that helps someone.